

이전 글에서는 Firebase Console + FCM Legacy API로 푸시를 발송해보는 내용이었다면,
이번 Part2에서는 구글에서 권장하고 있는 FCM HTTP v1 API을 사용(현재 기준 가장 최신)하여 푸시를 발송해보는 내용을 정리해보도록 하겠습니다. 이번에는 Postman, Terminal 그리고 OAuth 2.0 Playground를 사용해보도록 하겠습니다.
FCM HTTP v1을 왜 사용하거나 마이그레이션 해야될까요?
Firebase 문서에 따르면, Legacy > HTTP v1으로 마이그레이션 하거나, HTTP v1을 사용했을때 아래와 같은 이점이 있다고 합니다.
- 액세스 토큰을 통한 보안 향상
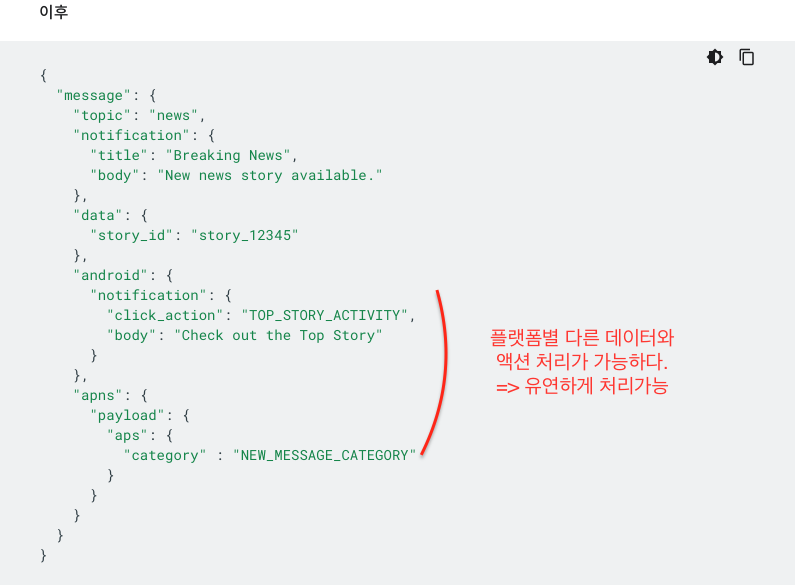
- 보다 효율적인 플랫폼에 따른 메세지 맞춤설정
- 새 클라이언트 플랫폼 버전을 위한 확장성 강화 및 미래 경쟁력 확보
가장 와닿는 큰 장점은 플랫폼 별 ex) iOS, Android, Web, Etc... 분기처리가 손쉬워진다는 점인 것 같습니다.
그리고 추가적인 보안향상은 덤 👏 (OAuth2 보안 모델에 따라 세스 토큰 수명이 짧기 때문에 토큰이 노출되더라도 최대 1시간 이후 사용 불가)
명확하고 간단한 알림 메세지

플랫폼 재정의로 맞춤 설정

FCM HTTP v1 Protocol + OAuth 2.0 Playground / Postman / Terminal
본격 메세지를 전송해볼까요?
우선 프로젝트 ID를 복사해봅시다.
- Firebase Console > 설정 > 일반 탭 > 프로젝트 ID 복사

👉 OAuth 2.0 Playground를 사용하여 Notification을 발송
- Google Developers에 OAuth 2.0 Playground에 들어갑니다. https://developers.google.com/oauthplayground
- Step 1(Select & authorize APIs) > Firebase Cloud Messaging API v1 클릭 > Authorize APIs 버튼 클릭

- Google OAuth 2.0 Playground을 정상적으로 사용하기 위해 연결된 구글 계정에 권한을 얻기위한 과정이 진행됩니다. 허용을 눌러주세요.

- Step 2 (Exchange authorization code for tokens) > Exchange authorization code for tokens 버튼 클릭 > Refresh token과 Access token이 생성됩니다.

생성된 Access token을 복사해서 푸시 메세지를 보내는데 활용할 수 있습니다. (Postman, Terminal)
- Step 3 (Configure request to API) 에서는 Postman, Terminal에서 처럼 API를 호출해 볼 수 있습니다. 아래와 같이 정보를 입력해주세요.
HTTP Method : POST
Request URI : fcm.googleapis.com/v1/projects/<프로젝트 ID>/messages:send
프로젝트 ID는(잊으신 분들을 위해) 아래와 같이 하면 획득하실 수 있습니다. 😄
- Firebase Console > 설정 > 일반 탭 > 프로젝트 ID 복사
Enter request body :
{
    "message": {
        "token": "FCM_TOKEN",
        "notification": {
          "body": "Body of Your Notification in data",
          "title": "Title of Your Notification in data"
        }
    }
}
Enter request body의 경우 아래 버튼을 눌러서 POST로 보낼 Body의 내용을 작성할 수 있습니다.
Json형태로 Body를 작성하고, 가장 아래 close버튼을 눌러주세요.

- Send the request 버튼을 클릭하면 아래와 같이 API request가 성공한 것을 확인 할 수 있습니다.
- FCM_TOKEN의 경우 내가 발송하고자 하는 주체(기기)의 FCM_TOKEN을 뜻합니다. (참조)

👉 Postman을 사용하여 Notification을 발송
HTTP Method : POST
Request URI : fcm.googleapis.com/v1/projects/<프로젝트 ID>/messages:send
Headers
- Authorization : Bearer <Access token>
- (위 설명중 Playground에서 발급받은 Access token 활용 또는, 별도의 방법으로 발급 받을 수 있습니다.)
- Content-Type : application/json
아래 Body를 넣어줍니다. Body > raw > JSON
{
    "message": {
        "token": "FCM_TOKEN",
        "notification": {
          "body": "Body of Your Notification in data",
          "title": "Title of Your Notification in data"
        }
    }
}
👉 Terminal을 사용하여 Notification을 발송
curl --location --request POST 'https://fcm.googleapis.com/v1/projects/<Project Id>/messages:send' \
--header 'Authorization: Bearer <Access token>' \
--header 'Content-Type: application/json' \
--data-raw '{
"message": {
"token": "FCM_TOKEN",
"notification": {
"body": "Body of Your Notification in data",
"title": "Title of Your Notification in data"
}
}
}'
마치며
Google OAuth 2.0 Playground / Postman / Terminal 세가지 버전으로 Firebase FCM HTTP v1을 사용, Notification을 전송을 해보는 내용을 정리해보았습니다.
FCM 사용하는데 있어, 작게나마 도움이 되었으면 좋겠습니다. 이상 포스팅을 마무리 합니다. 😄
긴글 읽어주셔서 감사합니다. ❤️
참고
firebase.google.com/docs/cloud-messaging/server
firebase.google.com/docs/cloud-messaging/migrate-v1
firebase.google.com/docs/cloud-messaging/http-server-ref
apoorv487.medium.com/testing-fcm-push-notification-through-postman-terminal-part-1-5c2df94e6c8dapoorv487.medium.com/testing-fcm-push-notification-http-v1-through-oauth-2-0-playground-postman-terminal-part-2-7d7a6a0e2fa0
developers.google.com/oauthplayground
'개발 공부 기록하기 > - Android' 카테고리의 다른 글
| Android Virtual Device 하단 버튼 제거 (0) | 2021.07.21 |
|---|---|
| 안드로이드 - 배경 투명도 조절하기 (0) | 2021.06.15 |
| FCM Push Notification with Postman Part1 (0) | 2021.01.18 |
| 앱 설치화면 보내기 또는 해당 앱 실행하기 (2) | 2019.08.25 |
| 왜 개발모드일때는 광고가 노출되지 않지? Failed to load ad: 3 (1) | 2019.01.02 |


